
7.3. Uploading a Video#
For more information, see the following topics.
7.3.1. Course Videos Page#
You manage videos for your course on the Videos page. This page lists the videos that you have added, along with the following capabilities and information regarding the videos.

A checkbox for Download and Delete bulk actions
A thumbnail of the file
The video name
The video length
Transcript status
An indication of whether the video is active in the course
An indication of the video status (failed, processing, or blank. The video is ready when that column is blank)
The three dot menu allows you to copy the Video ID, download the video, launch the Info Modal, and delete a video
7.3.1.1. Video Info Modal#
The Info Modal shows the date added, the file size, and the length of the video. The “Usage” section lists all Units where the file is referenced within the course. Clicking on each link will take you to the corresponding Studio Unit page.

This page also includes a Search option to help you find specific videos. For more information, see Find an Uploaded Video.
7.3.2. Uploading a Video for an MITx Online Course#
For MITx Online courses, you use MIT’s ODL Video Services (OVS) to upload your videos to the Video Uploads page. The MITx Online video process then creates multiple formats and sources for your videos.
Important
You will not use the video upload feature on your course’s Video Uploads page. This will result in an error and your upload attempt will fail.
7.3.2.1. Automated Video Process#
So that the MITx Online video player can automatically play videos in the best format for a learner’s device and internet connection, after you upload a video for an MITx Online course, an automated video process creates multiple formats and sources for every video. The process also assigns a single video ID to the video that represents all of the formats and hosting locations for the video.
Important
As soon as the automated video process has assigned a video ID to the video, you can add the video to the course. However, the video is not visible in the course until the automated process is complete. The process can take up to 24 hours.
The process encodes video files in different formats.
The process uploads the video files to the hosting service.
Either before or after the course team uploads a video file, the course team obtains transcripts from a transcript provider. When the MITx Online video process is complete, and the course team has obtained transcripts from the transcript provider, the course team creates a video component and adds the video ID and transcript to the component. For more information, see Add a Video to a Course.
7.3.2.2. Upload a Video to an MITx Online Course#
To upload video files, follow these steps.
Note
This process requires you to use your MIT Dropbox account. If you are unfamiliar with how to use your MIT Dropbox account, please see the documentation on the IS&T website.
Load your course videos onto your MIT Dropbox account. (You will navigate to your Dropbox later from ODL Video Services to upload the videos to your course.)
Note
Video types are limited to .mov and .mp4 files, and video sizes must be under 5 GB
Go to ODL Video Services. You will need to sign in with your Kerberos account.
Choose the collection associated with your course:
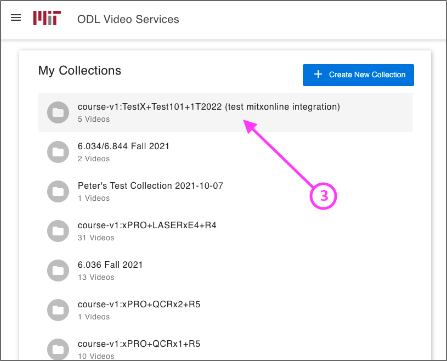
Note
You may want to use the Find command on your browser to look for your course number. Also note that there are several pages of collections, and you may have to use the arrows at the bottom of the page to navigate to another page to find your collection.
Click Add Videos from Dropbox:
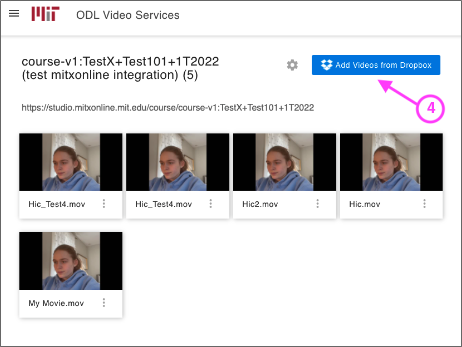
A pop-up will open showing your Dropbox account.
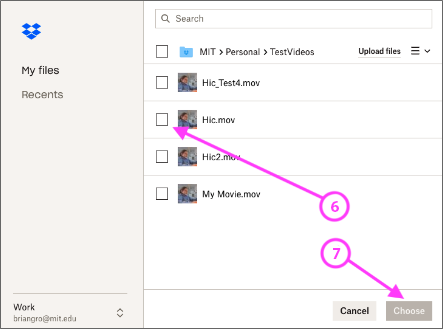
Select the videos you would like to upload by clicking the checkboxes. Please select the videos you would like to add (see #6 in the image below). Then click the Choose button (see #7 in the image below).
Important
Please do not attempt to upload more than five videos at a time, as it may result in an error.
OVS will take a few minutes to upload and process the videos. You will see the status change inside the collection folder. You do not have to remain on the page for process to run. If the process is successful, the video will appear in Video Uploads, under the Content menu.
Note
Video uploads, even very large ones, should take less than two hours to complete. If you have a video that is still processing after two hours, try uploading it again. If it still does not work, please report the issue to your assigned educational technologist.
Note
Once you have uploaded a video to your OVS collection, you may delete it from your Dropbox. It will not affect the video collection.
After the automated video process is complete, the course team creates a video component and adds the video ID to the video component. For more information, see Adding a Video to a Course.
7.3.2.3. Monitor Video Processing#
After your video files are successfully uploaded, the video processing service begins.
Note
This service takes up to 24 hours to complete.
A list of every file that you attempt to upload to the MITx Online servers appears in the Previous Uploads section of the Video Uploads page. The list includes each file’s status in the encoding and hosting workflow. In addition, you can download a report of the video files that you uploaded. For more information, see Downloading the Available Encodings Report.
7.3.3. Video Processing Statuses#
The encoding and hosting process assigns the following statuses to video files.
Status |
Description |
|---|---|
Failed |
Files did not complete processing successfully. If this status appears, follow these steps.
There might be failure instances where a small error message will be displayed
under the Failed status. In most of the cases when the error message is displayed, there
is a possibility of corruption in the uploaded file (either during the upload or the original
video file itself). However, if processing fails more than one time for a file, contact MITx Online support at |
Failed Duplicate |
Files failed to upload because the system identified the files as duplicates. |
In Progress |
Files are undergoing processing to create additional file formats, or are waiting for successful transfer to the host sites. |
Invalid Token |
A configuration problem has occurred. If this status appears, contact MITx Online support at |
Ready |
The encoding process is complete for your files. When you click the names of these files, a file on one of the external host sites plays. The encoding process might take 24 hours after you upload a file. Note For all courses, the “Ready” status means that the encoding process is complete. It does not refer to the transcript creation process. For courses that have integrated transcripts through 3Play Media or cielo24, the video is not ready for you to add to the course, or for learners to view, until the “Ready” status changes to “Transcript Ready”, signifying that the transcript creation process is complete. For courses that do not have integrated transcripts, you must make sure that each video has a transcript. For more information, see Non-Integrated Transcripts. |
Transcription in Progress |
The encoding process has completed, and video transcripts are being created. If a video has this status longer than the time that you specified for the Transcript Turnaround time, follow these steps.
If this problem occurs more than one time for a file, contact MITx Online
support at |
Transcript Ready |
Both the video encoding and transcript creation processes are complete. The video and transcripts are ready to add to your course and for learners to view. |
Partial Failure |
This status appears when the transcription process has been started for more than one languages and either one or more processes fail. This indicates a combination of successful and unsuccessful transcription processes. |
Transcript Failed |
All the transcription processes have failed. |
Unknown |
A configuration problem has occurred. If this status appears, contact MITx Online support at |
Uploaded |
The file has successfully completed uploading to the MITx Online servers. |
Uploading |
The file has not yet reached the MITx Online servers. If a video has this status for more than 48 hours, follow these steps.
If this problem occurs more than one time for a file, contact edX partner
support at |
7.3.4. Downloading the Available Encodings Report#
The Available Encodings report is a comma separated values (.csv) file that provides detailed information about the video files that you have uploaded. This report includes the status of the encoding and hosting process for each video file that you have uploaded, the identifier for the video, and the URLs for each encoding format. The MITx Online encoding and hosting process produces these alternative formats to ensure optimal playback quality for your learners.
You can view the Available Encodings report in a spreadsheet application or text editor.
To download the Available Encodings report, follow these steps.
Open the course in Studio.
On the Content menu, select Videos.
On the Video Uploads page, click Download available encodings (.csv).
Use a spreadsheet application or text editor to open the .csv file.
The .csv file includes the following columns.
The file Name.
The file Duration. If the upload process has not yet determined how long the file is, Pending appears in the Duration column for a video.
The Date Added, which shows the date and time that you uploaded the video file.
The unique, identifying Video ID. When you add a video component to your course, you supply the video ID for the file you want to add. For more information, see Adding a Video to a Course.
The Status of the encoding and hosting process for the file. For more information, see Video Processing Statuses.
The .csv file also includes a column for each of the formats that are the result of the MITx Online encoding and hosting process. These columns include the URL of a host site only after the format is successfully generated and delivered to its destination.
desktop_mp4 URL: The location of a 720p resolution video file in .mp4 format. Learners who view course videos with mp4 players view this file.
desktop_webm URL: The location of a 720p resolution video file in .webm format. Learners who view course videos with webm players view this file.
Note
The encoding and hosting process no longer creates .webm versions of the video files that you upload. Modern web browsers do not require the webm format. The .csv file includes the desktop_webm URL column to show the webm URLs for videos uploaded before this change. When you upload a new video, the column will remain empty, even after the encoding and hosting process is complete.
mobile_low URL: The location of a 360p resolution video file. Learners who download and view course videos on mobile devices view this file.
7.3.4.1. Remove Videos from the Video Uploads Page#
A list of every file that has been uploaded to the MITx Online servers appears in the Previous Uploads section of the Video Uploads page. You can remove videos from the Previous Uploads list without affecting course content that uses the video ID of successfully uploaded videos.
To remove a video from the Previous Uploads list, follow these steps.
Open the course in Studio.
On the Content menu, select Video Uploads.
In the Previous Uploads list, locate the row for the video that you want to remove, then select the “X” icon in the Action column.
In the confirmation dialog box that appears, select Remove to remove the video.
The selected video is removed from the Previous Uploads list. Course content that uses the video ID of the removed video is not affected.